Other HOW-TOs
Questions and Answers not directly related to MCCE
How to install WSL (Windows Subsystem Linux)
How to install WSL (Windows Subsystem Linux) and MCCE dev tools
WSL
WSL Installation
The official WSL installation instruction can be found on MIcrosoft website. https://learn.microsoft.com/en-us/windows/wsl/install
The following is the my WSL installation on WIndows 10 Pro.
- Open Powershell as Administrator, run
wsl --install
This installation will install Ubuntu under WSL. - Setting up user for Linux. After the reboot, WSL will ask for setting up the first user.
- While wsl is open, right click on the penguine icon on task bar to pin it so that it is easy to start wsl linux next time.
From WSL, to access the files on the host system (Windows 10), use the path /mnt/c for the C drive.
From the host (Windows), to access the files on WSL, use the path \\wsl.localhost\Ubuntu
To check WSL version, run wsl -l -v under PowerShell.
To check Linux version, run cat /etc/issue under Linux
WSL Virtual disk optimization
Linux under WSL uses a dynamic virtual disk. The virtual disk may be even larger than the physical disk on the host. In my case, the virtual disk is 1TB while I only have a 500 GB disk:
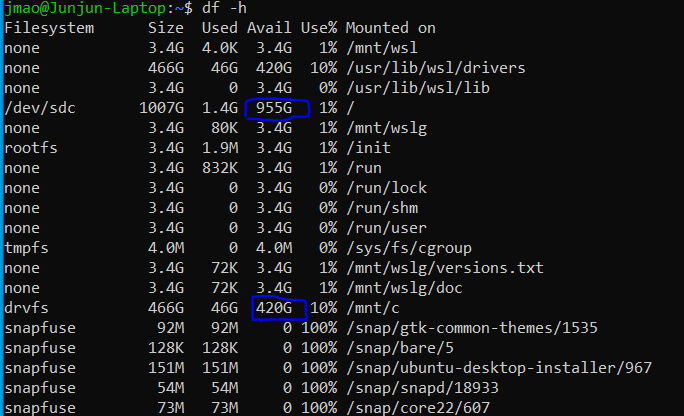
The actual usage after initial installation is about 2 GB, and the host will host will allocate more physical disk to it as needed.

However, once allocated, the virtual disk never shrinks. To shrink the virtual disk, I will need to do it through PowerShell.
- Open PowerShell as Adminostrator.
- Shutdown wsl instance:
wsl --shutdown - Run command
Optimize-VHD -Path C:\Users\Junjun\ Mao\AppData\Local\Packages\CanonicalGroupLimited.UbuntuonWindows_79rhkp1fndgsc\LocalState\ext4.vhdx -Mode Full
Linux customization
- Home directory: Add
cdto the user .bashrc so the terminal window starts at the home directory. - Update Linux:
sudo apt updatesudo apt upgradesudo apt install vim aptitude - Build essential
sudo aptitude install build-essential
Conda Python and Modules on WSL Ubuntu
Miniconda
- Download miniconda Linux installer to wls ubuntu instance:
wget https://repo.anaconda.com/miniconda/Miniconda3-latest-Linux-x86_64.sh - Run the downloaded script to install miniconda, yes to initilization set up.
bash Miniconda3-latest-Linux-x86_64.sh
Exit and start terminal after installation to enter the conda environment.
Python modules
conda install numpy scipy matplotlib pygraphviz pandas xlrd openpyxl
Compilers:
This is a little complicated. Currently PB solver delphi requires an old version of gfortran. That's the reason we wanted to install a conda version of compiler. Since we will adopt the new delphi which is compilable in C++, I decided to stick with the gcc from ubuntu OS.
Conda management
Revert base to clean state:
conda install --rev 0 --name base
conda clean --all
Microsoft Visual Studio Code
I am moving from Pycharm to Code due to
- Pycharm crashes at the start on my desktop.
- The ability of Code to code remotely vs ssh and wsl.
VS Code installation
Under WIndows (not under WSL), install VS Code.
- Download VS Code from https://code.visualstudio.com/
- Run the installer, select default set up options.
- If WSL was installed before VS Code, the first launch of VS Code will prompt for WSL extension installation. Install this extension.
VS Code WSL extension
WSL extension can be installed from extension market, which can be activated by CTRL+Shift+X.
To connect to WSL, click the remote icon at the bottom left screen, choose connect to WSL.
Other software under WSL
Install Xserver for Graphic User Interface
In order to run X11 applications, Python plot and ssh -X for example, you need an X11 library under WSL.
Install X11 and test apps
sudo apt install x11-apps
Run xclock to test.
Pymol
Pymol is a molecular structure viewer. I believe one can install Pymol either from conda or from Ubuntu apt package.
To install under conda:
conda install -c conda-forge -c schrodinger pymol-bundle
I experienced conda version Pymol crashes, so I installed a Ubuntu Pymol package. Since conda apps precedes ubuntu apps under conda environment, the two Pymols can be both installed.
conda deactivatesudo aptitude install pymol
How to contribute code to MCCE
MCCE Development Through Github
Part 1. One-time set up
On your workstation / coding computers, set up the git environment.
Identity:
$ git config --global user.name "<Your Name>"
$ git config --global user.email <your email>
Save credential for 6 hours:
$ git config --global credential.helper 'cache --timeout=21600'Save credential permanently:
$ git config --global credential.helper storeAlias of showing git history:
Add this to ~/.gitconfig
[alias]
lg = log --graph --abbrev-commit --decorate --format=format:'%C(bold blue)%h%C(reset) - %C(bold green)(%ar)%C(reset) %C(white)%s%C(reset) %C(dim white)- %an%C(reset)%C(bold yellow)%d%C(reset)' --all
Github access token
Github adopts personal access token to replace password authentication. In short, you need to use a personal access token as password to push commits to github. See documentation https://docs.github.com/en/authentication/keeping-your-account-and-data-secure/creating-a-personal-access-token
Be aware, once the token is created, you will not be able to see the token content any more. So save the token in a safe place. If you have successully pushed a commit to github and used above method to save credential permenently, the token is stored in ~/.git-credentials.
Part 2. Work with your own fork of MCCE project
MCCE project at https://github.com/GunnerLab/Stable-MCCE hosts the current stable code of MCCE. If you need to edit or add code, the recommended work flow is like this:
- Log in github and go to https://github.com/GunnerLab/Stable-MCCE, create a fork the repository so you have your own Stable-MCCE repository. This is a one-time set up.
- All the local code developing should be performed in a develope branch and pushed to the forked Stable-MCCE repo on github.
- Once the code is done and tested, create a pull request from the forked Stable-MCCE repo on github.
- After receiving confirmation that your pull request had been merged to the master repo, you can pull from the master repo to update your code and safely delete the develope branches.
Part 3. Examples of Git commands
Clone a remote repo:
Clone a remote repo to local computer:
git clone <url>
Convert a local directory:
Convert an existing local directory to local git repository:
git init
Add all files to track:
git add .
Add a single file to track:
git add <file name>
Check status:
git statusCommit:
git commit -a -m "<commit message>"
Show commit history:
git lg
Part 4. More on git branches
Create a new branch and revert to a past commit:
git checkout -b <new branch> <commit hash>
<new branch> is a branch name you make.
<commit hash> is the string as reported by git log
If you want to make this branch as the new master branch, do a swap as following:
-
make sure your are in the new branch
$ git checkout <new branch> -
force master to merge with current branch and use current branch as favored:
$ git merge -s ours master -
go to the master branch and reconcile again:
$ git checkout master $ git merge <new branch> -
after merge, delete the branch.
$ git branch -d <new branch>
Show branches:
git branch
Show remote branches:
git branch -r
Switch between branches:
git checkout <branch name>
Create and switch branch:
git checkout -b <branch name>
Merge branches:
git merge <another branch>
Merge with current favored:
git merge -s ours <another branch>
Delete branches:
git branch -d <branch name>
Force delete:
git branch -D <branch name>
Part 5. Sync remote and local repository
Check remote repo:
git remote -v
Add more remotes:
git remote add <remote> <url>
Pull from remote repo:
git pull
Or
git pull <remote> <branch>
Push to remote:
git push
Push new local branch to remote:
git push -u <remote> <branch>
Delete remote branch:
git push <remote> --delete <branch>
Delete remote tracking branch:
git remote prune <remote>
Often used on remote repo origin:
git remote prune origin
This command is useful to clean up the remote repository.
Part 6. Merge branches
Common scenario of merge:
-
Start a new feature:
$ git checkout -b new-feature -
Edit some files, then commit the change:
$ git commit -a -m "Start a feature" -
Edit some files, then commit more changes:
$ git commit -a -m "Finish a feature" -
Merge in the new-feature branch:
$ git checkout master
$ git merge new-feature
$ git branch -d new-feature
Conflict in merge:
When conflicts occur, the conflicting files will have visual marks like:
<<<<<<< master
conflicting text in receiving branch
=======
conflicting text in merging branch
>>>>>>> branch
You need to edit text and remove <<<<<<, ======, >>>>>> lines.
Then run a commit:
$ git commit -a -m "<commit message>"